
Front-end Development Kickstarter: All about the ZURB Template
Here’s a common situation - you’re a designer or front-end developer who is focused right now focused on a functional prototype, and you don’t need all of the complexity of managing a backend and server system. You get HTML and SCSS, but the complexity of writing a full-on javascript frontend in react or angular is more than you want to deal with right now. This is the exact reason why the ZURB template was developed, to give a rapid prototyping and static site development environment for teams using Foundation!
The ZURB template is the starter project that ZURB uses for every one of their client projects, enabling the ZURB team to deliver high quality coded prototypes as a design deliverable, within a very tight timeframe.
In this post I’ll do a thorough walkthrough of the ZURB stack - what it is, how to get it, and what all the pieces are inside the box. Throughout this post, I’ll use the terms “ZURB stack” and “ZURB template” more or less interchangeably. That’s because they mean more or less the same thing! The stack is the set of software that that is put into the template, and the Foundation team uses both terms to mean the same thing.
This post is pretty long - it's intended to be a reference more than a gentle introduction - so don't worry if you find yourself coming back to it in chunks.
What We'll Cover
- What Is the ZURB Stack, and What Isn't It?
- How to Get the ZURB Template
- What's In the Box?
- Source Files - How To Structure Your Code
What Is the ZURB Stack, and What Isn’t it?
The ZURB stack is a template of a static (front end only) web development project, maintained by the Foundation team and used by ZURB as the basis for all of their client projects. It uses a node-based build system, containing a gulp & webpack based system for compiling from scss, javascript, and html-based “source” files into a final built set of html pages. It contains tooling and conventions for decomposing html via partials, managing data and html logic with Handlebars.js, component-based scss, and modular javascript bundled via webpack.
This template is a great starting place for static sites and front-end rapid prototyping and development, and is optimized for rapid development by teams using html, SCSS, and relatively vanilla javascript. It is also a useful reference point for ways to integrate Foundation into a project. It is not in any way the only or even the ‘gold standard’ way of using Foundation. It happens to be the way that ZURB’s team of designers use Foundation, and is optimized for their usecase - typically rapid prototyping and an html+scss based ‘style guide’ - but there is nothing saying that your use of Foundation needs to fit into these domains. If you’re integrating with a backend system or an advanced JavaScript framework, your constraints and appropriate tooling may be very different. That being said, we’ve found that the decomposition of components both at the scss and the html level encouraged by the ZURB stack maps very well into component structures in other setups.
How To Get The ZURB Template
There are a couple of ways to get the ZURB template. Probably the simplest in the long term is to use the Foundation CLI. If you’re already using npm and node.js, you can install the CLI simply by running:
npm install --global foundation-cliOnce you have the CLI installed, you have a shortcut available to install Foundation projects using the ZURB template.
foundation new --framework sites --template zurbUnder the covers, what this is doing is using git to clone the template repository, and then removing the .git folder which contains the git history. You can do this directly using git and manually removing the .git folder:
git clone https://github.com/zurb/foundation-zurb-template projectname
cd projectname
rm -rf .git
Installing NPM Dependencies
The ZURB template comes with a set of npm package dependencies predefined - this is how it gets Foundation in place, as well as handles most of the tools it uses for building. If you use the CLI, after it creates the project folder for you it will automatically run `npm install` to install dependencies; if you manually clone the project you’ll want to run `npm install` inside of the project to install.
What’s In The Box
Let’s open up an empty ZURB stack project using Atom and take a look at what’s inside.
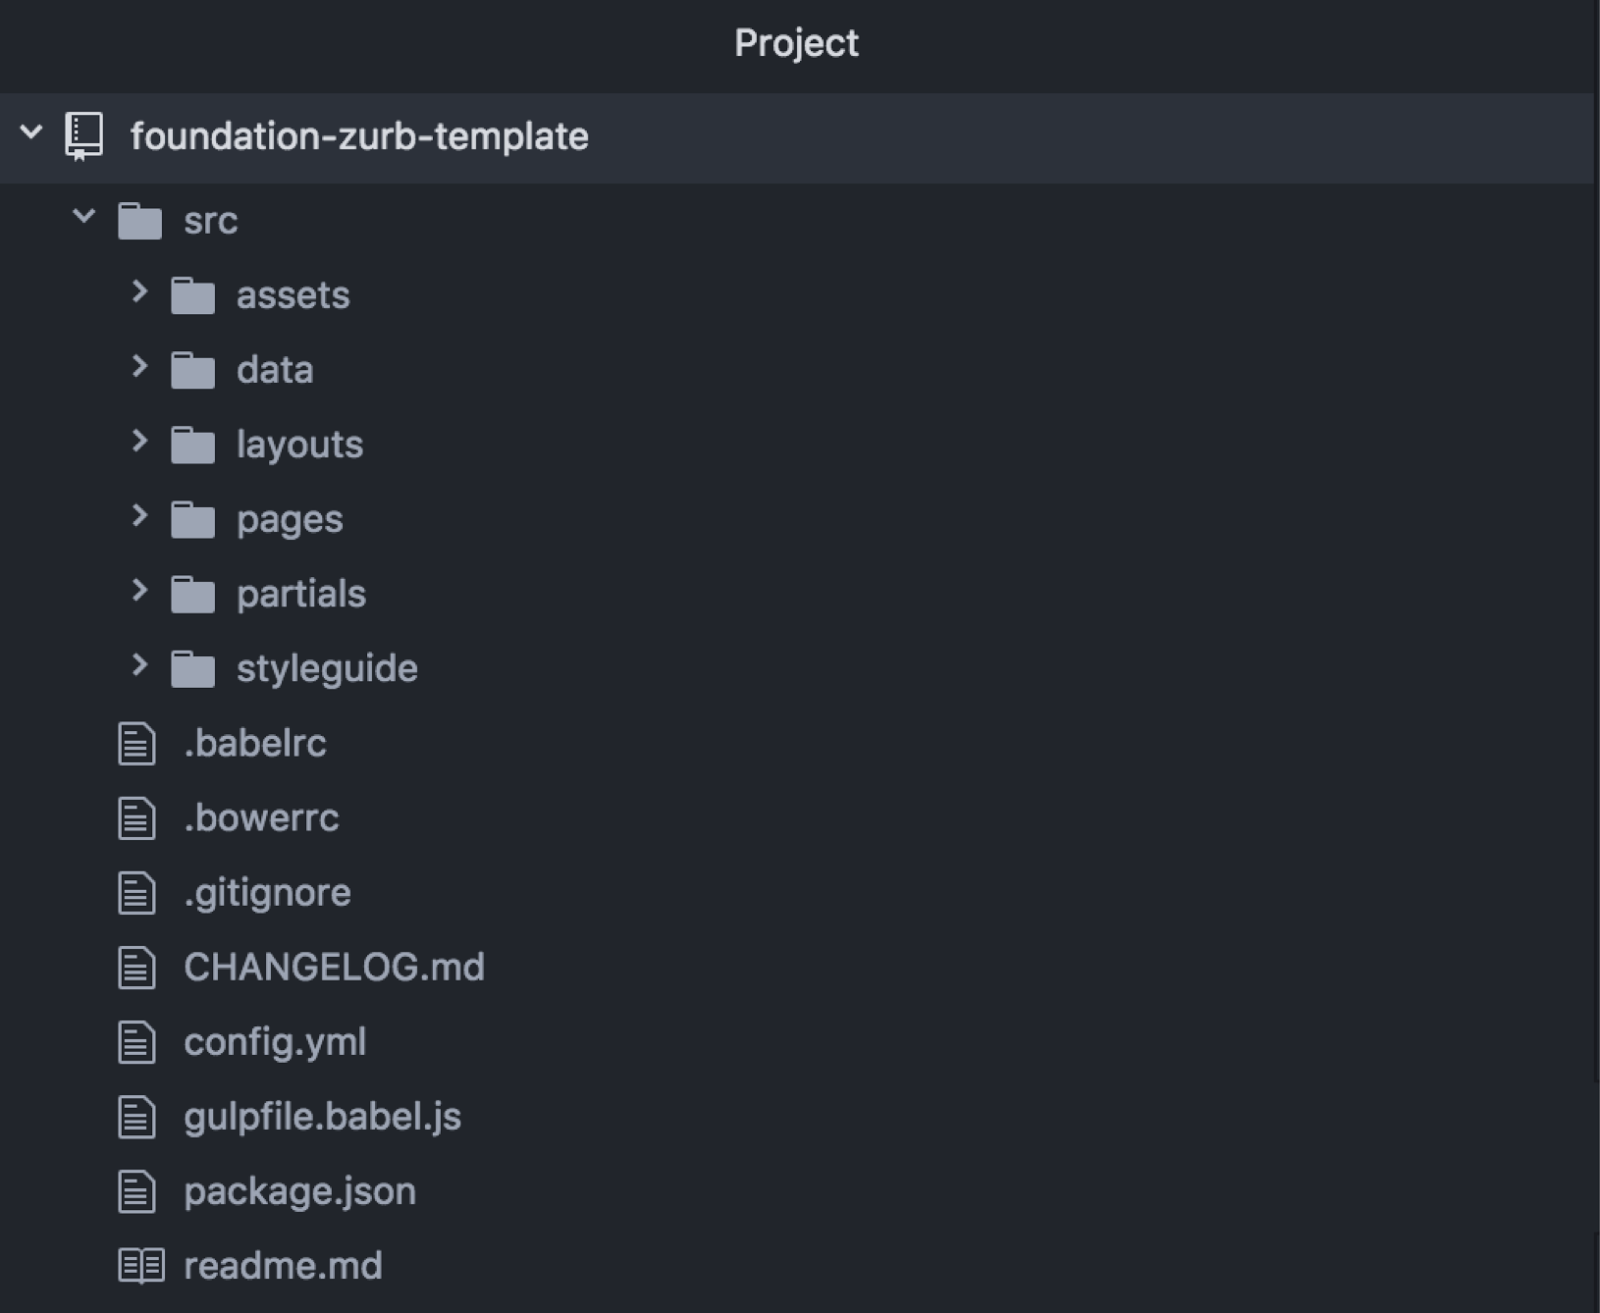
As you can see, there’s a `src` folder with a number of subfolders… this is where the code that we write will actually go. Before we get to it, let’s take a quick look at some of the other files that are in the root of the project.
External Tooling
There are a number of configuration files included in the ZURB template, each of them configuring a different tool. The first 4 I’m going to cover are for external tools we use like babel, bower, git, and npm.Babel
First, .babelrc contains some quick instructions to the babel javascript transpiler, essentially saying that we want to support the ES2015 spec for JavaScript. This allows us to use modern features of JavaScript that aren’t necessarily available in all browsers. Babel will then convert all of that javascript back to ES5 compatible javascript that is understood by every browser in use today during our build process.
Bower
There is still a .bowerrc file in the repository, but the ZURB template no longer uses bower so you can ignore this.
NPM
The Foundation ZURB template uses NPM (node package manager) to manage not only its “production” dependencies that will end up in the final website (Foundation, jQuery, what-input, MotionUI…) but also all of the tooling we use for building. The package.json file is what manages all of this and indicates what packages to install. This allows us to include third party dependencies without having to check them in to the repo, and generally leverage the open source community at large. A non-technical friend once described NPM and other package managers as “app stores, but for code”. I’m not going to go deep into NPM in this post, but if you want to learn more check out this great beginner’s guide on Sitepoint.
NPM package scripts
The one thing I do want to cover quickly from the ZURB template’s package.json, which is the NPM package scripts we’ve defined. Package scripts are user definable tasks you can run using the npm run command, and they get run in an environment that already knows all about the NPM configuration and where packages are installed. In the ZURB template, we just have two of these scripts:
"scripts": {
  "start": "gulp",
  "build": "gulp build --production"
},
The start script, runnable by typing npm run start or the shortcut npm start in your terminal simply runs our default gulp task. I’ll dive in to the gulpfile later in this post, but for now know that this builds our site in “development mode” and then serves it up locally using a tool called browser sync. It will also keep an eye on changes, rebuilding on change and refreshing.
The build script, runnable by typing npm run build runs our “build” task with production mode enabled. When we dive into the gulpfile a little more you’ll see exactly what that changes, but for now suffice it to say it does all the things we might expect in production - minifying javascript and css, removing sourcemaps, and the like.
Internal Build and Configuration
Now that we’ve got all of the 3rd party tooling configuration files out of the way, lets take a look through the build and configuration files that we have that are truly unique to the ZURB Template. I’ll cover the config.yml file that contains a set of static data used to configure our build, and then the custom gulpfile.babel.js that defines our build system. The reason for this separation is to enable you to separate your gulpfile into many files if your build becomes more complex, while still maintaining a single "source of truth" for configurations like file locations. As an example of how this might look, take a look at the gulp folder for Foundation Building Blocks.
Config.yml
The config.yml file is where the build systems keep a set of static configuration data, things that will be used in our gulpfile to build our project, but that aren’t themselves code. If you take a look in this gist, you’ll see the different components.
There are the following pieces:
PORT, which is the port used for your development server.COMPATIBILITY, which gets passed right through to autoprefixer to determine what browsers to target when compiling our css.UNCSS_OPTIONS, which are used if you enable uncss in the gulpfile to unused css as a part of the build(disabled by default)PATHScontains a set of paths used by the build.distto know where to put final files,assetsto know where to find assets to copy,sassto know what additional directories to make available to our sass compilation, andentriesto know what entrypoint to start our JavaScript from.
Gulpfile.babel.js
First off, before digging into everything the gulpfile is doing, let's quickly review what gulp is at all. Gulp is a javascript-based “task runner”, which essentially means it’s a way of programmatically defining sets of things to do. Gulp has two properties that set it apart from many other task-runners. The first property is that gulp that is a ‘streaming’ system, meaning you load files once, and then “pipe” them through a series of transformations, rather than reading and writing the files over and over again like grunt or maintaining a tree-based set of manipulations like brocolli. Second, gulp is a “code as configuration” system, meaning you configure the tasks by writing code. There are tons and tons of plugins out there for just about everything you might want run tasks on, and so most gulpfiles consist of importing a set of plugins and then wiring them together to create the system you want.
The ZURB stack uses gulp for its build process, as well as running a development server, so as we dig into this file what we’ll see is a series of tasks that combine to take your source code into its finished form.
Here is a gist of the entire gulpfile:
As I mentioned above, you can see that are gulpfile essentially has two parts - first it imports a bunch of dependencies and does a little configuration setup, and second it defines a set of tasks. I'm going to skip over the imports themselves, but let's look briefly at the configuration piece before jumping into the meat of the file - the tasks.
Gulpfile Configuration
// Load all Gulp plugins into one variable
const $ = plugins();

// Check for --production flag
const PRODUCTION = !!(yargs.argv.production);

// Load settings from settings.yml
const { COMPATIBILITY, PORT, UNCSS_OPTIONS, PATHS } = loadConfig();

function loadConfig() {
  let ymlFile = fs.readFileSync('config.yml', 'utf8');
  return yaml.load(ymlFile);
}
There's a few things this is doing. First, it loads all of the project's gulp plugins as values on the $ object. This auto-imports all gulp plugin packages, letting the file reference them in a consistent manner without having to manually import them all. When you read through the tasks below, you'll see these plugins referenced throughout... they'll look like $.sass, $.autoprefixer, etc.
Next, the file checks if it is in production mode with the relatively obscure-looking line const PRODUCTION = !!(yargs.argv.production);. Unpacking it, this uses yargs, a commandline argument parser to see if the production flag is set. It wraps the entire thing in a '!!', which is a JavaScript idiom for coercing a value into a boolean. Essentially, if you ran gulp using the --production flag (like the build task did above), PRODUCTION will be set to true, and the gulpfile can modify its behavior accordingly.
Finally, the loadConfig function is used to load a bunch of constant values from our config.yml file for the gulpfile to use.
Gulp Tasks
Now let's dive into the tasks defined in the gulpfile.
// Build the "dist" folder by running all of the below tasks
gulp.task('build',
 gulp.series(clean, gulp.parallel(pages, sass, javascript, images, copy), styleGuide));

// Build the site, run the server, and watch for file changes
gulp.task('default',
  gulp.series('build', server, watch));
The primary task, build, runs through a series of relatively intuitively named functions - starting with clean, followed by pages, sass, javascript, images, and copy all in parallel, and finally running styleGuide. The default task (triggered by just running gulp or npm run) runs through build, then launches server and watch. You could probably guess what most of these are doing just from the name, but let’s go through them in a little more detail so if you want to change them around later you know how.
Clean
// Delete the "dist" folder
// This happens every time a build starts
function clean(done) {
  rimraf(PATHS.dist, done);
}
This one’s pretty straightforward - rimraf is a homophone for ‘rm -rf’, also known as “blow this directory away”. PATHS.dist comes straight from the configuration in config.yml, as the path where your final compiled files will go, so what clean does is blow away the distribution folder so the build can start afresh.
Copy
// Copy files out of the assets folder
// This task skips over the "img", "js", and "scss" folders, which are parsed separately
function copy() {
  return gulp.src(PATHS.assets)
    .pipe(gulp.dest(PATHS.dist + '/assets'));
}
Also pretty straightforward, the copy function takes everything identified in PATHS.assets, which is a glob for everything in assets that is not already an img, js, or scss folder, and copies it straight into the assets subfolder of the PATHS.dist folder for compiled code.
Pages
// Copy page templates into finished HTML files
function pages() {
  return gulp.src('src/pages/**/*.{html,hbs,handlebars}')
    .pipe(panini({
      root: 'src/pages/',
      layouts: 'src/layouts/',
      partials: 'src/partials/',
      data: 'src/data/',
      helpers: 'src/helpers/'
    }))
    .pipe(gulp.dest(PATHS.dist));
}
This is where we start to get to the meat of what makes the ZURB stack interesting. This task is taking all files that end in html, hbs, or handlebars from the pages directory and passing them through this thing called panini before outputting them into the dist folder. Panini takes a whole slew of options for layouts, partials, data, helpers, etc... what the heck is this thing?
At a high level Panini is a “flat file generator” that lets us squish together layouts, subtemplates (partials) and data to create html files. If you’re familiar with systems like Jekyll or Assembly, this is similar. Panini uses the Handlebars templating language, and adds some handy dandy utilities that makes generating data-driven static pages a breeze. The ZURB template uses it to generate its HTML pages, which is what lets us break our HTML down into nice componentized and reusable HTML partials. We’ll get into the details of all of the different pieces a little later on in this post.
Reset Pages
// Load updated HTML templates and partials into Panini
function resetPages(done) {
  panini.refresh();
  done();
}
This function we can pretty much skim over - it’s used as a helper in the live reload task to clear panini’s state before we regenerate pages, you shouldn’t ever need to modify it.
Style Guide
// Generate a style guide from the Markdown content and HTML template in styleguide/
function styleGuide(done) {
  sherpa('src/styleguide/index.md', {
    output: PATHS.dist + '/styleguide.html',
    template: 'src/styleguide/template.html'
  }, done);
}
This task deserves a post in and of itself; it’s using a tool called sherpa to facilitate creating an html & scss coded styleguide. I’m not going to cover it here, but those interested should check out the style sherpa github repo for more information.
Sass
// Compile Sass into CSS
// In production, the CSS is compressed
function sass() {
  return gulp.src('src/assets/scss/app.scss')
    .pipe($.sourcemaps.init())
    .pipe($.sass({
      includePaths: PATHS.sass
    })
      .on('error', $.sass.logError))
    .pipe($.autoprefixer({
      browsers: COMPATIBILITY
    }))
    // Comment in the pipe below to run UnCSS in production
    //.pipe($.if(PRODUCTION, $.uncss(UNCSS_OPTIONS)))
    .pipe($.if(PRODUCTION, $.cleanCss({ compatibility: 'ie9' })))
    .pipe($.if(!PRODUCTION, $.sourcemaps.write()))
    .pipe(gulp.dest(PATHS.dist + '/assets/css'))
    .pipe(browser.reload({ stream: true }));
}
This function is compiling our Sass into CSS, and is a bit more complicated than some of the others that we’ve looked at. Let’s unpack what it’s doing a little bit. It starts from loading the app.scss file… that is the “entry point”, the file that will serve as a starter from which we will import other files and determine what the output css is. It then pipes that file through a sourcemap initialization which captures the initial contents of the file in order to be able to generate sourcemaps after transformation.
Next, the build begins transforming the Sass by piping it into a sass plugin to compile it into CSS. The Sass plugin takes an ‘includePaths’ parameter, which tells it what paths to look in to find imports - the gulpfile simply passes the set defined in the config.yml file.
After compiling from Sass to CSS, the task does a couple more transformations, first using autoprefixer to handle browser-specific variations, followed by either minifying the css with cleanCSS (if in production mode), or writing out the sourcemaps (if in development mode). Finally, it outputs the CSS to the distribution folder, and let browserSync know to reload the browser.
JavaScript
// Combine JavaScript into one file
// In production, the file is minified
function javascript() {
  return gulp.src(PATHS.entries)
    .pipe(named())
    .pipe($.sourcemaps.init())
    .pipe(webpackStream(webpackConfig, webpack2))
    .pipe($.if(PRODUCTION, $.uglify()
      .on('error', e => { console.log(e); })
    ))
    .pipe($.if(!PRODUCTION, $.sourcemaps.write()))
    .pipe(gulp.dest(PATHS.dist + '/assets/js'));
}
The JavaScript function bears a great deal of similarity to the Sass function. This is because with the inclusion of a module bundler like Webpack, the structure of the JavaScript build process is itself very similar to the Sass build. There is an entry, or set of entries - JavaScript files that will serve as starters which will import other files and run the actual code. The task then passes the files through named() to create a webpackStream compatible set of files, initializes sourcemaps, and then pipes into webpack. The one potentially confusing thing here is the pipe through named - and honestly, it kind of confuses me too. I'm not exactly why this is necessary but for some reason webpackStream doesn't seem to accept files straight from gulp but needs them transformed by named before it can handle them correctly.
There’s nothing magical about the pipe into webpack - it is doing exactly the same thing the sass compilation above did, transforming the “source code” of separate modules of JavaScript with import statements linking them into a single output file of JavaScript ready to run in the browser.
There is then the same distinction as in Sass - in production the build uglifies the JS down to a minimal possible filesize, while in development it writes out the sourcemaps to enable easy debugging.
Images
// Copy images to the "dist" folder
// In production, the images are compressed
function images() {
  return gulp.src('src/assets/img/**/*')
    .pipe($.if(PRODUCTION, $.imagemin({
      progressive: true
    })))
    .pipe(gulp.dest(PATHS.dist + '/assets/img'));
}
The images task is pretty simple, copying images from our source directory to our dist folder, but it does do one really cool extra thing. If you’re in production mode, it automatically passes those images through imagemin, seamlessly minifying them before they hit your end-user’s browser.
Source Files - How to Structure Your Code
Now we get into the code we’re actually going to be writing to make our ZURB stack project go. There are a few key components of this, each with their own conventions that are helpful to know about. We’ll go through each one in turn.
SCSS
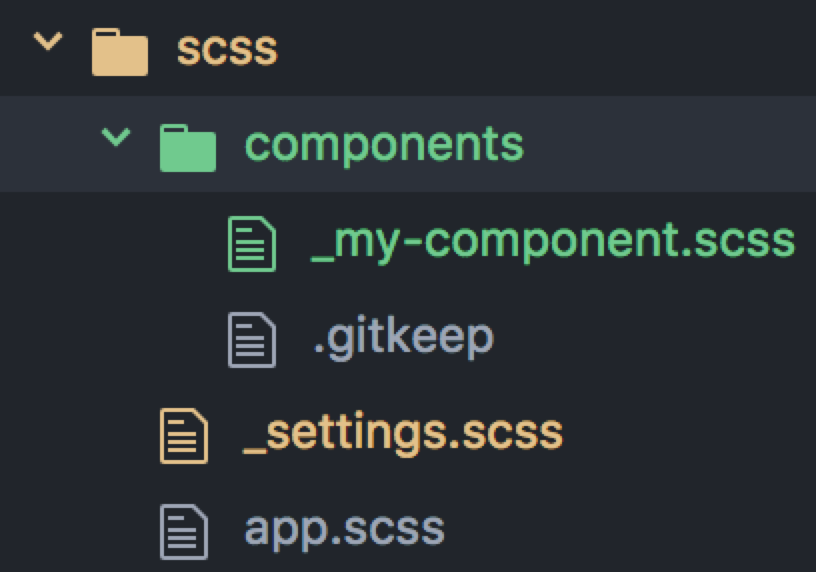
The SCSS structure in the ZURB stack has three main pieces to it, though of course you can add more as you like.
app.scss
First, the app.scss file is our “entry point” into the SCSS. As discussed when we talked about SCSS in our build process, this file is kind of like a central station for all of our CSS. It imports the tools we need, includes the mixins we want to use, and puts together all of those pieces into our final CSS file. Ideally, this file should contain no actual CSS - it merely consists of a set of imports and includes, while all of the logic and CSS generation occurs in either libraries or your component scss files.
_settings.scss
Next, the _settings.scss file is a one stop shop for manipulating Foundation components, and ideally all of the other pieces of your SCSS. It is where you can define color palettes, font sizing, rounding radiuses, and dozens of other things to tweak. When you start a new project, it contains all of the default values for Foundation’s components, as a starting point for you to modify, but you can add new values if you need them for your own components. This allows you to keep all of the graphical and stylistic choices for your web site in a single spot, and lets you rapidly change and iterate upon them as needed. Especially when rapidly prototyping or working in a fast-moving environment, this is a phenomenal productivity boost as completely re-skinning your application can sometimes be as quick as changing a set of variables in the _settings.scss file.
components
Finally, there’s the SCSS code you’re actually writing. The ZURB template comes with a components directory because we recommend breaking down all of your SCSS by component. Ideally, you’ll be able to organize everything into component-level styles, which will make your code easier to maintain and reuse. That said, we have also found uses for page level styles, usually by having a pages directory with files for each page that needs them, and occasionally even a global directory for special typography and related files. As you write the scss files, you can then @import them into your CSS at the end of your app.scss file.
JavaScript
The structure of the ZURB stack JavaScript has undergone a big shift with the 6.4 release, and so this is an area where it is important to understand what is going on. Prior to 6.4, Foundation was not using any sort of modern JavaScript dependency management, and so all of the JavaScript files were simply being concatenated into one big file. That approach, while simple, has all sorts of problems and issues, which is why with the 6.4 release Foundation adopted true JavaScript module dependency, and with it restructured the way that the ZURB stack JavaScript works. There’s a couple of ways in which this approach differs dramatically from the old, and those show up in how the ZURB stack JavaScript is structured.
Let’s break down those differences, and then dive into how it works now.
Difference #1: No more default global.
In the old JavaScript world, by default everything lived in the global namespace, so you could always refer to it. This could lead to all sorts of possible conflicts and problems, but it made other things very simple. Many libraries (Foundation included) leaned on this to manage their dependencies. Want to depend on jQuery? Simply include it in the page before your JavaScript and reference jQuery assuming it will be there. Foundation utilized this to set up a global window.Foundation object that you could use to get a handle into any of the Foundation code or components.
In the new world of modular JavaScript, by default all variables are only local to the file you’re in, and you explicitly import dependencies that ideally do not have any “side effects” (ie running code without being told to). This means that in order to recreate the global object behavior that many Foundation developers are used to, we will explicitly add things to the window object.
Difference #2: Explicit vs implicit inclusion.
This next difference is related to how the ZURB template JavaScript used to be set up. In the old approach, since it was only implicitly tracking dependencies by the order in which we dumped code into the global namespace, you could “automatically” add any new JavaScript files to the build process. Add another file? Ok, it will just get appended to the globally running code.
In the new world, since dependencies are explicit, utilizing a new file requires an import statement. And if you’re following best practices, that import should be “side effect free”, meaning you then explicitly tell the code to run after you import it!
Let’s look at how these differences play out in the ZURB stack JavaScript structure.
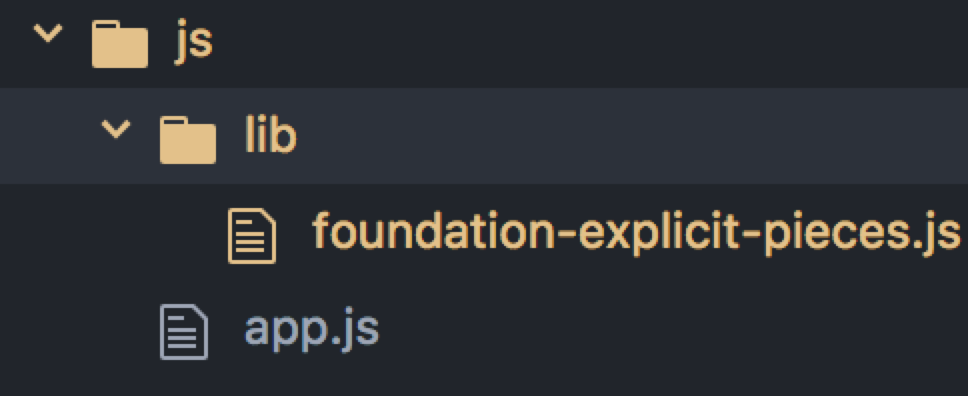
Entry file: app.js
The new starting point for the JavaScript is an “entry” file, similar to the way that SCSS has an entry file. This is the JavaScript’s “grand central station”, coordinating what is going to happen and setting everything up. In the default setup it doesn’t do very much - it imports jQuery and what-input, adds the $ object from jQuery to window to recreate the global jQuery object you might be used to, and then imports all of Foundation. This default import from Foundation loads all of the JavaScript components from Foundation, as well as adding them to jQuery for $.fn.foundation jquery helper we all know and love.
Customizing more: foundation-explicit-pieces.com
What if you don’t want to include all of Foundation, but only a few specific pieces? In the old way of doing things, you’d simply comment out the files you didn’t want to include from config.yml and away you’d go… but this had a serious problem. Since dependencies weren’t manage explicitly, you could end up removing things that later files depended on, and shoot yourself in the foot. In the new world, all dependencies are managed explicitly in JavaScript, by doing imports, so you will never end up in a situation where a file you’re importing doesn’t have its’ dependencies… but you need to edit your imports inside the JavaScript itself. To do this, within the ZURB stack, comment out the import Foundation from 'foundation-sites'; from app.js and comment in import './lib/foundation-explicit-pieces';. Then dive into that explicit pieces file and remove what you don’t need.
At first glance, that explicit pieces file looks like a LOT to get your head around… but that’s because it’s being 100% explicit about importing each piece of Foundation, and there’s a LOT in Foundation! It becomes simpler to understand if you realize that there’s essentially 2 pieces for each module, and they are conceptually very similar to the way Foundation’s SCSS has always worked. First, there is an import statement. This loads the JavaScript code for that module and makes it accessible, corresponding conceptually almost exactly to @import from scss. Second, there is an initialization phase… this is where it actually sets up the JavaScript... in this file what it is doing to do so is typically either just putting a reference to the object on the global Foundation object (for utilities), or initializing the object as a Foundation “plugin” using the Foundation.plugin method.
The first of these, adding it on the global object, is done only for backwards compatibility - to recreate the global access that many Foundation developers are used to. If you don’t use it in your own code, you don’t need to do it - all of the plugins will import their own dependencies anyway. The second, registering as a plugin, hooks the plugin into the jQuery $.fn.foundation helper that lets us instantiate and reference the Foundation JavaScript objects from data-attributes in the DOM. Most folks using the ZURB template will be doing this, so I recommend leaving that in.
Regardless, if you want to remove a plugin that you’re not using from your compiled JavaScript, simply comment out or delete the import line for that plugin, and the corresponding initialization further down in the file.
HTML
The ZURB template uses a tool called Panini to allow us to decompose our HTML into reusable layouts and partials. Panini is built on top of Handlebars.js, a JavaScript based HTML templating language. By using these tools, we can use data and logic within our templates to create reusable components, customize pieces per page, and much much more. For this post, we’re just going to go into the basics, but to see an example of what’s possible here check out the Foundation Building Blocks, a complex application with dynamic content, complex embedded pages, and a JSON API all generated as a static site through clever use of Panini and extension of the ZURB stack. I'm not going to cover Panini in great detail, but if you want to learn more check out the Github repo.
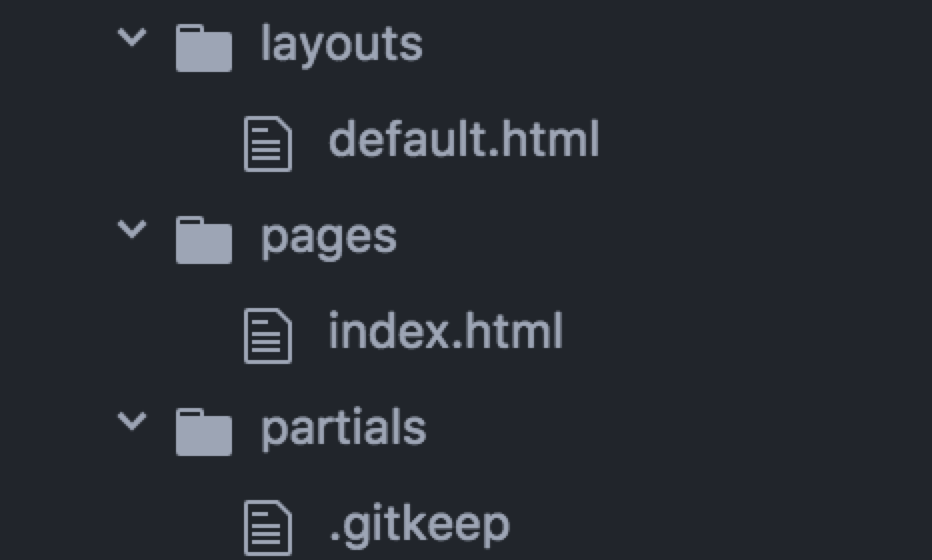
Layouts
The first key piece of the HTML structure in the ZURB stack is layouts. Layouts are reusable templates that you can put page content into - they may be quite basic, simply containing a shared head, or they may be quite complex. However complex your layout, it should contain a reference to {{> body}}. This syntax essentially means “render the partial named body”, where body is a special partial defined by Panini to contain your per-page content.
Pages
The next, and key piece, are the pages. These are where the meat of your content will go - each of these files will turn into a page in your final site. There are two key things to be aware of here. The first is front matter - the content between two --- lines at the very beginning of the page. This is data in yaml format that Panini will load and make available to your page. This is where you would set which layout you want the page to use (defaults to ‘default’), as well as set page-specific data that you can use to customize content within the layout or any partials you happen to render.
Partials
Partials are snippets of HTML that can be plugged in and reused anywhere throughout your pages or layouts. You can think of them as analogous to the component files you have in your scss - typically a component will be represented in HTML as a partial. You include a partial in your page using the syntax {{> partial-name}} , where the name is set by the filename of the partial (minus its extension). You can pass data to a partial by added space separated data like this {{> my-card title=”Hello there” content=”World”}}. This allows you to create truly reusable components that vary based on your content.
Data
The final set of source files in the ZURB template are the datafiles, configured to live in src/data. This is where you can set up arbitrary data for use throughout your site. Some examples of how you might use this are to define global navigation, lists of categories/icons, or repeated text like brand names. The ZURB template doesn’t come with any predefined datafiles, but you can define them as YAML files, JSON files, or even JavaScript files that export a JavaScript object. These files will be loaded by Panini and available to your pages in global namespaces based on filename. So if you create a file called navigation.yml, the contents will be available for you within every layout, page, and partial as an object called navigation.
Wrapping Up
Well folks, that’s everything in the ZURB stack. I hope this has been helpful to you and answered all of your questions, but there’s anything that is still confusing, don’t hesitate to ask in the comments below. Or if you find this super helpful, leave me a comment for that too! I love to hear from you.